

I know that you use a Google account that allows you to connect to Google services such as YouTube, Gmail, Google Drive, and more as I know that a Google account has a simple overlay, and there are many settings that can affect your privacy I will tell you about 6 settings you need to change in your google account so let’s go.
6 settings you need to change in your Google account
When we are dealing with Google and privacy there are some settings that must be done to ensure that you will get the best of them and they are as follows
1. Disable location history
When you use Google products or services frequently, there is a high possibility that Google has a record of every place you visited, not only that but when you visited each place and how long you stayed there. This information is used by the company either to display personalized maps or suggestions based on places you’ve visited, to help find your phone with Find My Device, to get real-time traffic information, and of course to show you ads that are more relevant to you.
Google keeps track of the places you’ve been as long as you have your phone with you, and aside from a potential privacy breach on the company’s part, keeping this data could pose a security risk. If someone has your account password, then they can see every place you’ve ever been in the Google Maps timeline.
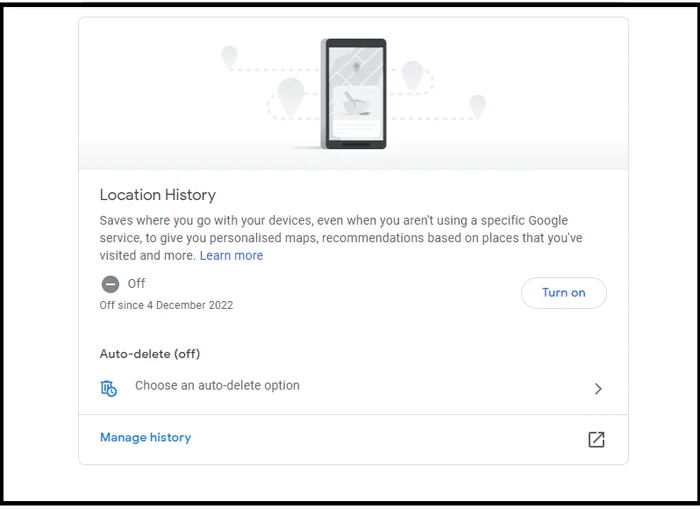
you can turn off Location History for your account at any time just by clicking on Data and Privacy then Location then clicking Turn off Also, you can choose the auto-delete location data that is more than 3 months old or more.
2. Customize personalized ads
As you probably know, Google displays its ads that appear on YouTube, Gmail, and other sites based on the Google AdSense service based on the information it collects about you from various sources so that it focuses on showing you ads that are relevant to you according to your interests, thanks to the Personalized Ads feature which is on by default. Although it is possible to completely disable this feature, it will not lead to displaying fewer ads in general, but will make Google display its ads randomly, whether you are interested in the advertising content or not, and therefore it is expected that inappropriate ads or containing sensitive topics will appear.
Therefore, instead of disabling the feature, you can inform Google of the topics that you want more or fewer ads to be shown about, even if you search for these topics on the Internet, Google will refrain from displaying ads related to them. So it is imperative that you do not let it get messy and personalize your ad experience as long as you have a Google account, at least to avoid seeing inappropriate ads. Let me tell you that doing this is very easy and done through one page which is the Ads Management Center.

From here you can have more control over the types of ads that appear to you, just go to the Personalize Ads section and choose Show More or Show Less ads in relation to the topics or brands that you want to show more or fewer ads about. You can also limit the appearance of ads on sensitive topics such as alcohol or gambling ads…etc. From the “Privacy Management” section, you will be able to control the sources that Google uses to display targeted ads, for example, preventing the use of YouTube view history as a source
3. Enable two-step verification
two Step Verification has proven effective in preventing widespread cyber-attacks, thanks to which you can prevent hackers from accessing your account by using an additional layer of protection, in addition to your password, this feature adds a quick second step to verify your identity either with a text message or a call phone number associated with the account. Although it is simple, it is really an important step to help you make sure that your personal information is protected and that it is kept private and secure.

If you create your account after 2021, activating 2-step verification will be mandatory to ensure account protection, according to Google. As for the older accounts, the feature will be disabled by default, and you can activate it via the Security page after logging in to the Google account, then you click on Two-Step Verification and then Get Started and follow the steps that appear on the screen, including verifying the phone number.
4. Determine what will happen when your account becomes inactive
By default, when two years have passed since the account has not been used, Google will automatically delete it. Deleting an account will affect all Google services associated with this account differently, as there is data that remains and others that are deleted completely. In any case, Google provides users with a feature that enables them to set up a plan to determine the fate of the account after death or in the event that there is no ongoing activity. This feature is called Inactive Account Manager.
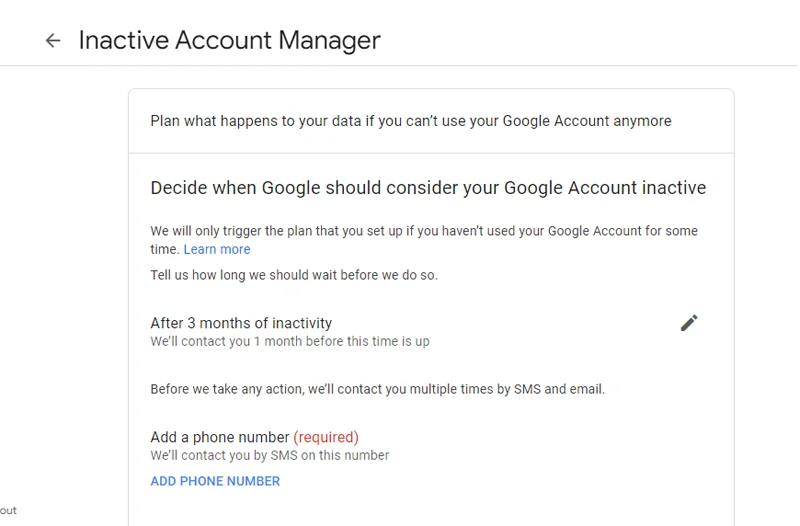
In general, through this feature, you can specify when Google should consider your account inactive and how to handle your data after that. You can choose to share your data on various services such as Gmail and YouTube with a trusted user or ask Google to permanently delete it. To set up this feature, you can go to the Inactive Account Manager page after logging in and click Get Started.
5. Enable Enhanced Safe Browsing
Among the protections that Google provides to user accounts is Enhanced Safe Browsing, which adds a layer of protection against phishing and malware in both Gmail and the Google Chrome browser, so that if you receive rigged attachments on your Gmail mail, you are alerted of this in order to avoid Downloading them, or when visiting fake sites or downloading malicious materials while browsing on Google Chrome, you will also be alerted and access to this site will be blocked unless you agree to that.
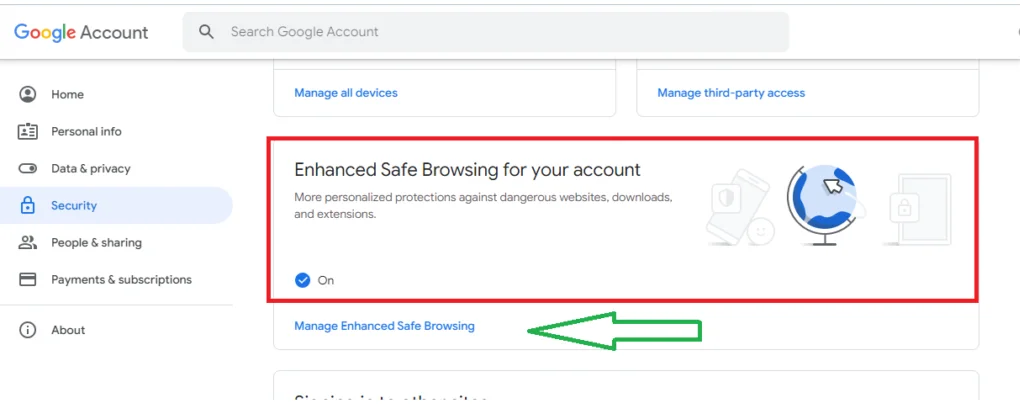
But in order to achieve this, data such as the addresses of the sites you visit, downloads, and the contents of mail attachments will be sent to Google for evaluation and verification that it is safe. If you don’t mind, we recommend that you enable Enhanced Safe Browsing protection as disabled by default, for faster, more proactive protection. All you have to do is go to the Enhanced Safe Browsing Protection for your account page after logging in and activating the feature.
6. My activity verification
The My Activity page is a hub for displaying all the activities that the user has performed on Google services associated with the account, such as Google Maps, YouTube, and Google Search. Literally, any activity that you have done on Google services will be recorded on this page, and it can even include actions that you perform on Websites, apps, and devices that use Google services or voice and audio recordings such as the Google Assistant. So it’s an important page and reveals a lot of who you are, so you probably don’t want anyone else to be able to see the contents of that page in any way, even if someone has access to your account.

Fortunately, there is a feature that protects your activity on Google by requiring verification of identity before allowing access to your full history, but it is disabled by default. To activate it, all you have to do is go to the My Activity page, then click on the Manage verification of my activity button, and from the window choose Require extra Verification and then click Save. As such, the activity history will only appear after the account password is entered first.
Finally, I hope my article added some valuable information to you. If you have some questions? Let me know in the comments below. I’ll try my best to answer them.


