

For many years, passwords have been the only thing that secures our online accounts, but with the spread of electronic attacks such as phishing and others, they have become less secure to ensure the protection of user information and data. Technology companies are well aware of this. Microsoft and Apple, along with Google have been working for some time to adopt a simpler and more secure way to log in to accounts without relying on passwords. The alternative was passkeys In this article, we will talk about Google Passkey and how to use and enable it so let’s start.

1. What is Google Passkey?
Instead of making login primarily rely on passwords and two-step verification (if enabled), the Passkeys feature aims to make the password a secondary option, or not an option at all! So you can log in to any service associated with your Google account, such as YouTube, Google Drive, Gmail, Blogger, or the Play Store, without traditional passwords and other login methods like two-step verification or SMS messages. Instead, you can use biometric authentication supported on your computer, laptop, tablet, or phone, such as fingerprint or facial recognition. Even if your device doesn’t support biometric authentication, you can use a PIN code consisting of at least 5 digits.
Regardless of the authentication method you choose, it will be linked to an encrypted key stored locally on the device and serves as the password , when logging into the account. This provides a higher level of security and protection since there is no actual password that can be secretly stolen in a phishing attack. Additionally, this key can only be used for one account. If you activate this feature on a second account on the same device, a different encrypted key will be created for that account, but both remain associated with the authentication method you are using.

In short, the new Passkeys feature is Google’s vision for securing online accounts from the widespread attacks happening every second around the world. When activated in your account, you’ll be able to use a passkey when logging into Google-affiliated applications and services or when suspicious activity is detected, requiring additional verification. All you need to do is use the same method you use to unlock your phone or computer, whether it’s fingerprint recognition, facial recognition, or a personal identification number (PIN). However, there are some conditions that must be met in order to activate and use the Passkeys feature in your Google account.
2. Conditions if you want to activate the Google Passkey feature
Operating System Requirements for Computer:
- macOS Ventura for Mac devices
- Windows 10 with Windows Hello enabled for desktop and laptop computers
Operating System Requirements for Smartphones:
- iOS 16 or later for iPhones
- Android 9 or later for Android phones
Browser Requirements:
- Chrome version 109 or later
- Edge
- Safari 16 or later on Mac devices
Bluetooth Requirement:
- The computer you want to log in from must support Bluetooth technology and have it enabled. This helps prevent remote attackers from deceiving victims and gaining access to their accounts.
3. How to activate Google Passkey?
To activate the Passkeys feature on your Google account through your computer or laptop, you first need to open the Google Chrome, Safari, or Microsoft Edge browser and make sure it is updated to the latest version, then go to the Google Account page and after logging in to your account using the usual password, click on the section. Security from the side menu to display the account security control page. Here, click on the Passkeys option under the How you sign in to Google section. Alternatively, click on the link at g.co/passkeys to be directed to the desired page. Then click on the Create a passkey then Continue.
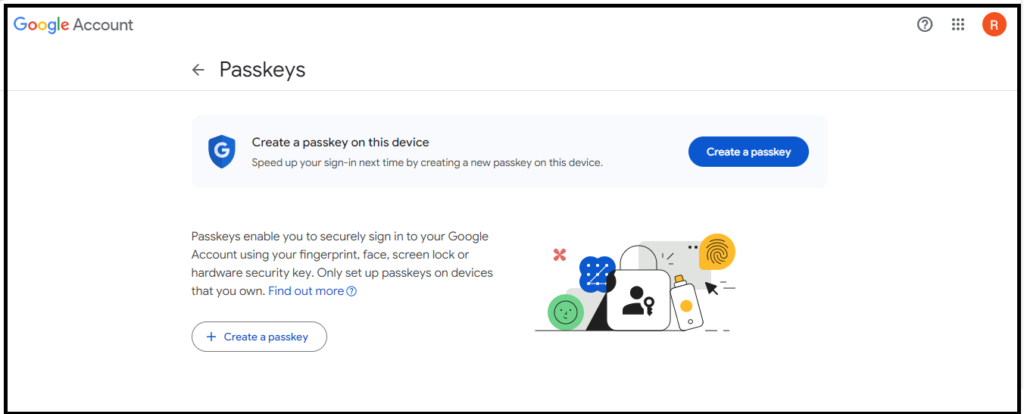
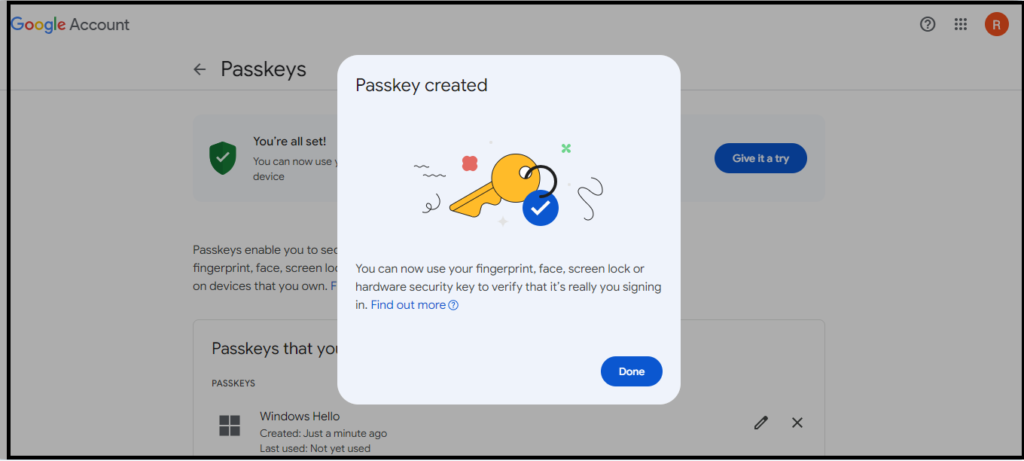
You will be asked to use the available authentication method in your operating system. For example, on Windows, you can use the Windows Hello feature for biometric authentication, such as facial recognition, fingerprint reading, or entering a PIN code – depending on what is available on your computer or laptop. When the Windows Security window appears, all you need to do is confirm your identity in the way you usually use to unlock Windows. Once completed, a message saying Passkey created will appear, and it will be added to the Password Keys page within your account settings. According to Google, the passkey is stored on your computer by the browser and will never be shared with Google or any third party.

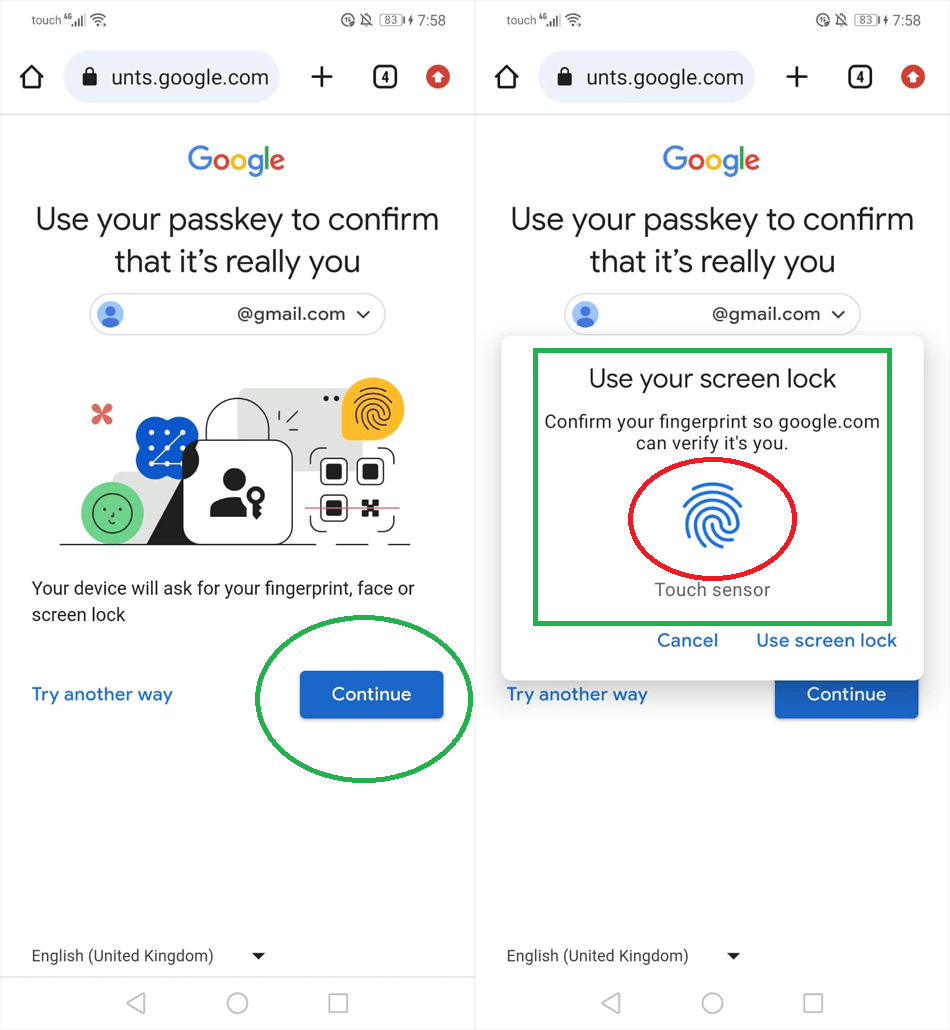
Now, the passkey has become the primary method for logging into your account on the same device. For instance, if you attempt to log into your Google account on a new browser from the same computer, after entering your email, you’ll see a screen that says Use your passkey to prove your identity. After clicking Continue, you will be asked to use the supported authentication method in your operating system to confirm your identity, and then your account will be opened.
The current login methods, including passwords, will remain available when needed. For example, if facial recognition is not possible due to a camera issue, or when logging in from another device running an older operating system that does not support Passkeys technology, you can choose the Try another way option and use the traditional password or receive a verification code via SMS. However, the passkey remains the primary method for securing the login process.
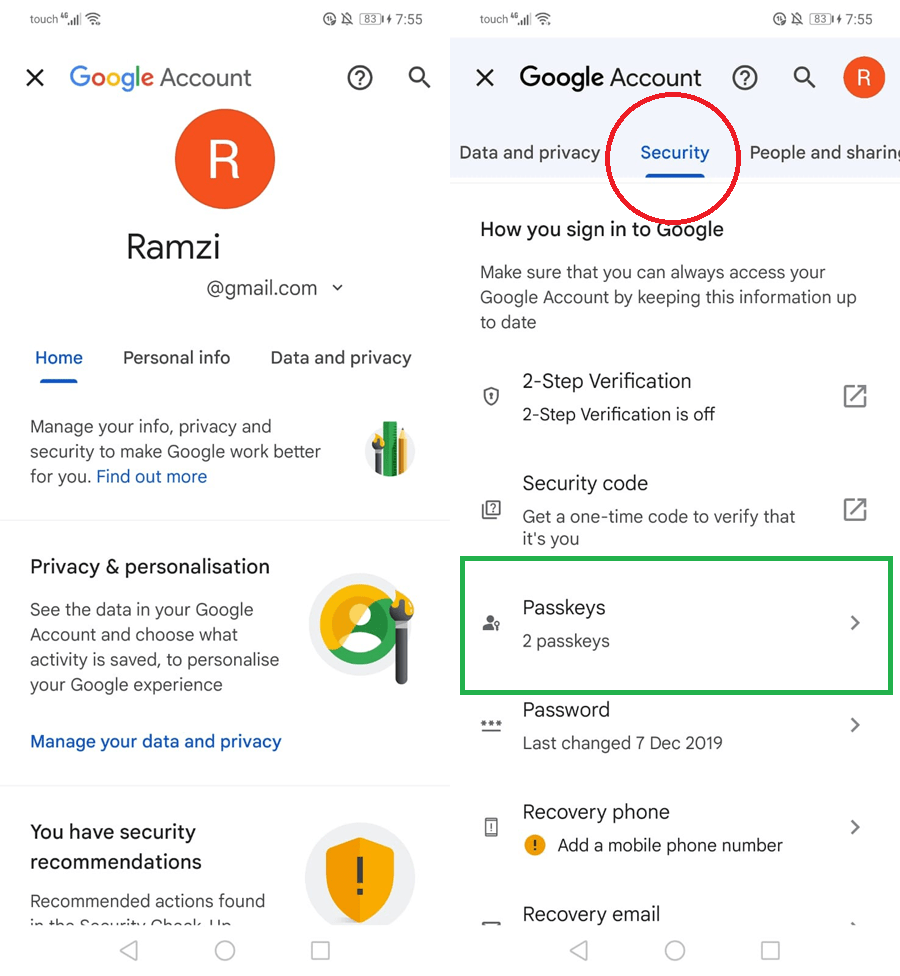
You can also activate the Passkeys feature on your Google account directly from your smartphone, either through the web browser by following the same activation steps as on a computer, as described in the previous paragraphs, or from within one of the Google apps installed on your phone, whether it’s an Android or iPhone. For example, if you are using the Google Search app, after launching it, click on the profile picture in the upper corner of the screen, and then from the menu, click on Manage your Google Account to open a new window that includes account settings. Then, go to the Security section, scroll down, and click on Password Keys. On the next screen, click on the “Create a passkey button and then Continue.
Once again, you will be asked to confirm your identity through the supported authentication system on your phone. For example, if you’re using an iPhone, technology like Touch ID for fingerprint recognition or Face ID for facial recognition will be used, depending on the supported features of your device model. The same applies to Android phones. After confirming your identity, a message will appear confirming the storage of the passkey for later use when logging into your account.
It’s worth noting that the encrypted passkey may not necessarily be stored locally on all smartphones but is securely saved in the cloud for synchronization across other devices you own. For example, if you activate the Passkeys feature in your Google account from your iPhone, this passkey will be stored on the iCloud Keychain, making it available on other Apple devices associated with the same iCloud account. This ensures your ability to log in using the passkey in case you lose your devices and makes it easier for you to transition from one device to another.

After activating the Passkeys feature, an identity verification window using biometric authentication will appear every time you attempt to log into your Google account from the phone where you activated the feature. Here, Google warns against using a shared phone with others to activate password keys for your personal account. If you do so, anyone who can unlock that phone will be able to access your account.
4. How to use Google Passkey on a new device?
If you have activated the Passkeys feature on your Google account on any of your devices, whether it’s a computer or a phone, and you later need to log in on a new device for the first time or use someone else’s device temporarily, you can use a passkey stored on your phone or computer for this purpose. All you need to do is make sure to activate Bluetooth technology on both devices (the one already registered with your Google account and the new device you’re trying to log into).
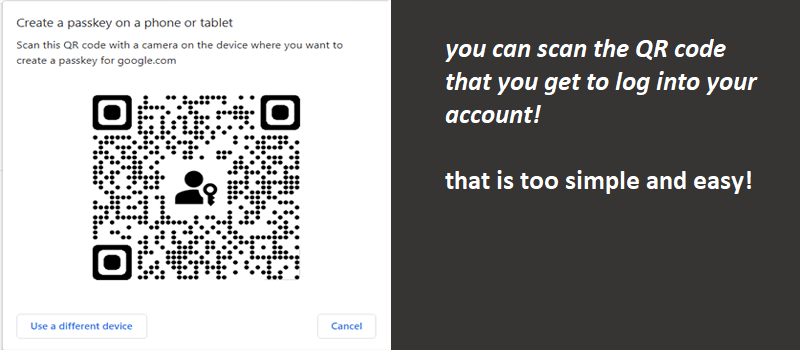
Then, go to the Passkeys page on your phone, which is already registered with your Google account, and click on Create a Passkey. In the window that appears, click on the Use another device option. After that, a QR code should appear on your phone’s screen, and all you have to do is scan this code using the phone you’re trying to log into your account from. Once you confirm this on the first device using fingerprint or facial recognition, the account will be opened immediately on the other phone. It’s worth noting that the login process using the passkey on the other phone will be temporary. If we assume this other phone is your new device, you can permanently store the passkey on it through the Passkeys page.
The same method applies to a computer. If you’ve activated Passkeys on your Google account and linked the login key with biometric authentication on your phone, and later need to log in to Google from your computer, all you need to do is open the login page in a modern browser. Then, enter your email, and when the screen Use your passkey to prove your identity appears, click Continue and select the option Use a phone or tablet to generate a QR code.
Conclusion
As new tech has been developed it needs some time to spread between users google tries to make you safe with easy new tech stuff as passkey but sometimes you need to know more about tech before trying it or simply make a Google search to know more about this tech.
Finally, I hope my article added some valuable information to you. If you have some questions? Let me know in the comments below. I’ll try my best to answer them.


